March 31, 2012

Fabric Doll & Wardrobe

For Christmas my mom gave me an old sewing pattern from her stash:


While the concept is good, the pictures on the front didn't really depict the kind of doll that I was interested in. So I altered the feet came up with this:


A naked doll isn't that much fun to play with, however. So dug out my fabric scrap pile and got to work on creating a wardrobe. This part was too much fun:


Shorts, Wrap Top with snap closure  & a replica of my ubiquitous infinity scarf.


Striped boatneck shirt that I wish I had in my size.

Wrap dress, gray leggings and some green leather shoes.

Gray dress with a pearl buckle (and a risque neckline).

Cowlish-neck sweater with gray flannel pants and some kicky blue leather shoes.


Rainjacket!


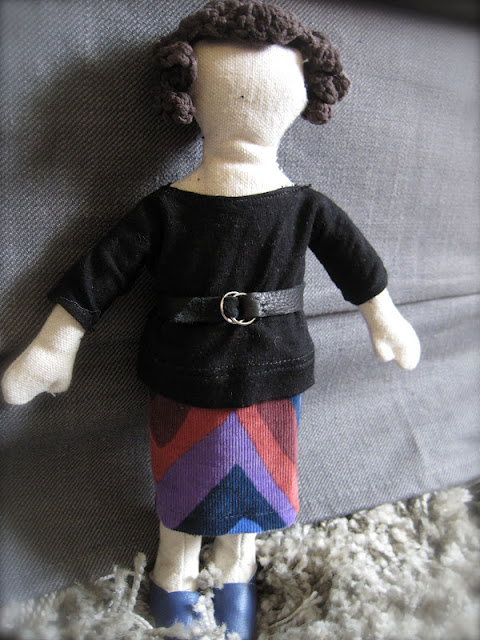
Black boatneck shirt and leather belt paired with a corduroy skirt.


Summer dress, leather belt, infinity scarf and leather shoes


The doll's hair is a "wig" (it's removable and repositionable) and was crocheted out of yarn. Everything was made out of scraps (the beauty of working on such a small scale). This doll would be hard for smaller kids to play with though because it's about the size of a Barbie. My next venture will be to scale the doll up to about 18". I also hope to make additional changes to the arm placement, leg attachment and head shape.


March 26, 2012

I got myself a new crock pot!

We've been cooking at lot at our house lately - dishes that are primarily protein and vegetables. Soups and stews work really well because we're then able to take leftovers to work for lunch the next day. We've been in the habit of making a big soup meal on Sunday, and then eating the leftovers all week for lunch. I found several great recipes that don't require a crock pot (see below), but they do require a time commitment on my part, which is a little hard to tackle during the work week.  So, based on the recommendation of Gina at Skinnytaste.com, I purchased the Hamilton Beach "Set & Forget" 6-quart Programmable Slow Cooker. Unlike my existing crock pot (inherited with my marriage), this new one is programmable! Which means I don't have to limit my crock pot cooking to anything that takes at least 10 hours. I can program this one to cook for 4 hours, and then it just switches to warm. It also comes with a meat thermometer, which I can stick in a roast for instance, and the crock pot will switch to warm once it reaches a certain temperature. Genius! At least in theory - I haven't tried it yet.

My inaugural crock pot recipe was Asian Pork with Mushrooms from the aforementioned Skinnytaste. Her recipes are generally simple and low calorie, so I searched for crock pot recipes and bookmarked all the ones that sounded interesting. It didn't disappoint. I served it over rice noodles and under cilantro. It does make quite a bit, and the asian flavor means it's not quite as versatile in using up the leftovers. Next time I'll either make less, invite friends over for dinner, or find more ways to be creative with it.


Below are a few other recipes that we've made recently, not necessarily in the crockpot.

Beef Barley Vegetable Soup

This was made partially in the crockpot and partially on the stove - resulting in deliciousness. Mike  requested that I make a soup like this, so I searched online until I found a recipe with lots of good reviews. I never would have thought to make this because it reminds me of canned soup, which I cannot stand. This was great though, and it goes into my recipe binder to make again.

Next was Carne Guisada, a Columbian version of beef stew.
This is a pretty thick stew served over rice (I may have served it with Quinoa - my new favorite grain). I didn't have the adobo or achiote, so I think the flavor was a little bland. I tried to compensate with other seasonings, but I wasn't too successful.  That said, I would make it again and try to get my hands on the missing ingredients.

Lastly, Mike made us a meal (don't ever let him fool you - he knows how to cook)! In order to get Mike to make dinner "willingly" he does have to be excited about what he's making, so he chose to go with Jamaican Brown Stew and Red Beans & Rice. He grew up with meals of this sort in Florida, so he was excited to make it for me and our good friends. He's much more methodical than me when he cooks, so when he found out that I hadn't gotten all of the exact ingredients, he had to go to the store to pick them up (I tend to improvise - which does sometimes result in bland meals - see above). The chicken in this meal stays on the bone, so it didn't quite seem like a "stew" per se. It was also a little harder to eat (particularly when sitting on the couch watching a basketball game). I'm not sure why the chicken had to be on the bone, so I think this would be worth making again with de-boned chicken thighs (allowing the chicken to mix in with the veggies and therefore be more stew-like). It would also stretch further, as the individual chicken pieces ensured that there was a limited number of servings.

March 15, 2012

Bakin' Bread


Bakin' bread has been a goal of mine for quite some time. With the help of my Pa, and the practice of our cob pizza oven, I have gotten quite comfortable with the making & baking of pizza dough, but bread was a little more daunting. For Christmas I asked for a copy of Artisan Bread in Five Minutes a Day, and dubious though he was, Papa obliged. Since then I have been baking on a weekly basis, and there hasn't been a fail yet.

I've mainly stuck to the Master Recipe of Boule (free-form loaf), but I've played around with the flours (all-purpose, bread flour and wheat flour). I usually form the loaves into ovals or circles, but I have played around with making small rolls, and even once tried the Pain d'Epi (wheat stalk bread), but my "wheat stalk" pattern was not photo-worthy (it's harder to make than it looks).

The idea behind making bread in 5 minutes a day is that you make a master batch of dough and it sits in your fridge for up to 14 days. One can periodically cut off 1 lb portions and bake it up throughout the 2-week period. This works well for us because a 1 lb loaf is not very big, and in our 2-person household I've thrown out a lot of stale or moldy bread because we don't eat it fast enough. We generally manage to get through these small loaves before they go bad.


In order to make this work there are a few "tools" that make the process easier:


A 6-quart plastic (food-grade) tub with a lid (not air-tight) is very handy. I use this container to mix the dough and store it in the fridge. I bought two of these Cambro tubs at Amazon for $17. I use one for dough and the other houses my flour.


While not crucial, a pizza peel is very handy for transferring the dough into the oven. I let the dough rise on my peel for 40 minutes then slide it directly into the oven. The finely ground cornmeal you see below also helps in sliding the dough smoothly. This is a trick Pa taught me in transferring pizzas into the cob oven and it's saved a lot of pizza toppings from sliding off the dough and hitting the oven floor.


A baking stone and broiler pan are also important to achieving that perfect crust. The broiler pan contains a cup of water and turns that hot oven into a little steam room, and the baking stone helps to evenly distribute the heat.

While it certainly takes more than 5 minutes, it does take relatively little time to bake this bread, and it truly does seem to turn out fine every time.  The other great thing about this book is that in addition to all the bread recipes (including cinnamon rolls, bialys, bagels, pretzels, pizza, etc) there are recipes for dishes to accompany the bread.  For instance, there are pizza topping ideas for the pizza dough, kebab and fattoush recipes for the pita and even a recipe for preserves to go with the chocolate bread. While I haven't tried any of these extra recipes yet, their mere presence makes me quite excited for the possibilities.

March 12, 2012

Pretty in Pink (Coral)


My friend from high school, Stephanie, is about to have a baby girl in April. Since it's her second child I knew that she'd have a lot of stuff already, but since her first was a boy (and I know she's decorating the nursery in pink) I thought I'd make her a few pink gifts. Or rather coral, since pink isn't really my thing.

I searched online for a few gift ideas for baby items that weren't too time consuming to make and that I thought could be fun and useful. I came across lots of versions for "loveys" in yarn and fabric. Based on my reading, it appears that a "lovey" is a small blanket with some tactile nature to it. Some mothers said it helped their babies with sleep training, as they like something to hold onto while falling asleep.

I opted for sewing, which led me to the "minky" section of Fabric Depot. I have never purchased this fabric before because I think it is mainly marketed for baby items; and it's very expensive ($22/yd at Fabric Depot). They have an incredibly large selection of patterns and colors, which proved to be a problem. I knew it had to have pink in it (coral) but I couldn't bring myself to buy the really "girly" patterns. I found this turquoise/coral/black owl pattern that was cute, and then bought some ribbon with coral flowers on it (to up the girl ante without pushing it over the edge).

I think there are lots of tutorials online for this, but my process was:
1)  Cut two 13" squares of minky, and 2 yards worth of 2" sections of ribbon.
2)  Fold the ribbon in half, pin it along the edge of one square (right side up) with the ribbon loops facing toward the center of the square (raw edges aligned with raw edges of the square).
3)  Sew around the edges to secure the loops.
4)  Place the second square over the first (right sides together) and sew along the edge again, leaving an opening to turn it right side out.
5) Lastly I top-stitched along the edge (for a finishing touch and as a last measure to secure the ribbons).


The second item I made was a Pacifier clip from the Made blog. The idea here is that one end clips to your baby's clothes/blanket/bib/stroller and the other end goes around the pacifier handle (secured with velcro). That way when baby decides she's done with that pacifier it doesn't fall on the ground or under the couch.


Dana's tutorial on Made is very good, and I made a few variations based on personal sewing preference.


March 9, 2012

Portland's Culinary Workshop


Last night Mike and I took a class from Portland's Culinary Workshop. I came across this place when they ran a Groupon in the fall (which I failed to purchase) and I've been periodically checking their class calender waiting for the right opportunity.  It came in the form of "Culinary Travels through Latin America".

The location of the workshop is very convenient (just a few miles from work and next to a brewery - which was extra convenient as we arrived early and needed a place to cool our heels before the class started). The space was light-filled, with tall ceilings and plenty of workspace. Susana, our instructor, was a great teacher with an equally great sense of humor.


Our menu for the night was:

       Mojito-garlic Dipping Sauce

       Tostones (fried plantain chips)

       Palmito (hearts of palm) & Jicama Salad

       Moqueca De Peixe (Coconut fish stew) served over Yucca

       Dulce de leche with Poached Papayas

It was a very hands-on class, which I appreciated since I am a learning-through-doing kind of person. We spent a fair amount of time prepping ingredients and learning a few tricks (like the best way to peel garlic cloves, make a garlic paste and cut onions). The actual "cooking" portion of the meal did not take long, and we only did a little of it personally. We prepped the Yucca but it was boiled by the sous chef (this was fine, as I can only assume that most of us already knew how to boil water). The sous chef also poached the Papayas, but we were all able to observe how the poaching liquid was put together (note: always poach in flavorful liquid) and it was just another example of heating water. The other part we didn't do was prepare the Dulce de Leche. This process takes two hours so it was done before we arrived. However, making dulce de leche goes like this:

• buy can of condensed milk
• peel paper label from can
• put can in pot of water
• simmer for two hours
• chill can in fridge
• open can

We all felt okay not doing this portion personally, and man did it taste delicious.


The verdict:

I would definitely make the mojito-garlic dipping sauce again, as I think it would be a good accompaniment to empanadas.

Tostones are a little too "fried" for my taste, but they were delicious and I'd make them again for a dinner party.

The Palmito & Jicama salad was very refreshing, and definitely a good vegetable side dish for any of my Mexican dishes.


The coconut fish stew was good, but a little lacking in flavor. I think that the instructor didn't want to add too much spice since it was a mixed crowd. She did add a few thai chilis, which didn't seem to permeate the stew too much, but did do a hell of a number on my mouth when I inadvertently bit into one (yeoww). The other down-side to this recipe is that it calls for Dende Oil (palm oil) which seems like it could be rather pricey and hard to find. 


The Yucca is a starch much like a potato, but a little firmer and with a little more flavor. I thought it tasted great, but I do have a "thing" against Yucca so I'm not sure if I could bring myself to buy some in the future. 

The dulce de leche was fabulous and I would make this again to drizzle over ice cream or brownies. I wouldn't make the poached papaya again because I think it's a rather bland fruit, but I might substitute mango, pears or apple however.


All in all, I had a great time, learned something, and I would love to take another class. I have my eye on making cheese, decorating cakes, canning veggies and preserves, and learning the 5 key sauces!

March 7, 2012

El Luchador


This is El Luchador.

El Luchador is a Mexican Wrestler.


And he is stronger than an elephant.


This crocheted figure is about 6" (don't let his small stature fool you, he took that elephant). The pattern is from Owlishly, who also designed the centerpiece pattern that I used in the Flower Girl Mobile.

I made this for my nephew Aidan, who took up wrestling this year, and just rocked at it. Aidan is a very dedicated kid and open to trying new things. This trait impresses me to no end.

March 2, 2012

More pillow covers


After completing the guest pillow covers for our office, I took a second look at the pillow covers in our living room (from Ikea) and decided that I was over them. So back to Bolt I went and I purchased the same fabric pattern but in a different color.

I had four square down pillow forms from Ikea that I intended to re-use, but our biggest complaint about them was that they were too flat. So I opened them all up and divided one bag between three others. This allowed them to all be a little bit bulkier. That said, I would not recommend doing this indoors, as opening up four down pillows makes quite a mess.

I decided to use a different technique on these pillows than the last ones (for learning purposes only). I followed the pattern in Sewing in a Straight Line to create zipper closures for the covers. After sewing all those bags for Christmas the zippers didn't pose much of a problem, and the way they were created was quite interesting (it involved a basting stitch over the zipper, which was ripped out later). This is the only pattern from the book that I've used so far, but I found it pretty easy to follow (the pattern was called "World's Easiest Zippered Throw Pillow", afterall). There are two quilts in the book that I would really like to make, which is why I bought it, but if you look like the model shown on the cover of the book, there are probably a couple dresses/skirts that you'd like as well.


The new pillows add a nice touch to our green couch (which was really punchy enough already), but Mike and I  have our eyes on a new charcoal couch cover, which if we ever purchase, will really make these new pillows pop!
Related Posts Plugin for WordPress, Blogger...