December 31, 2010

Yo-dahhh!


When 900 years you reach, look as good, you will not.


When Christmas rolled around this year, I questioned, what to get the 8-year-old boy who has everything? Ah, but a needle felted Yoda, he has not.

The body is needled out of green roving. The brown smock is flat wool felt, glued to the front of the body. The cream cloak is sewn from cotton fabric. I found the stick in driveway, whittled and sanded it down, then glued it to his hand. He should dispense sage advice for years to come.

Christmas 2010

Mike and I spent a "too quick" 4 days with family in NW Washington for Christmas. It went by so quickly, and it felt like we couldn't spend enough time with each person, but we did enjoy every moment that we did share. Some of the Holiday Highlights:

• Visiting the Golden Distillery on Samish Island, just minutes from Mom & Mark's house.


• A five-hour lunch in Vancouver, BC, with my cousins and my new 1st-cousin-once-removed, Cohen!

• Dinner with Remi & Andrew, and breakfast at the local Bakery

Mom, Bobby, Sara, Remi & Andrew taking Gibbs & Jack for a walk to the Bakery.


• Teatime with Katie & Jan, and getting to see how much Max has grown in the last month

• Christmas Day at Susanna & Claytons

Bobby, Mom & Mike (and the animal heads)


Aidan with his food (he opened a present, found it full of food, looked a bit confused for a minute, then remembered that he had asked Santa for food to put in his new treehouse).


Have you ever seen an 8-year-old so excited to receive a snuggie?


A touch of Calgary - a new cowboy hat from Uncle Will

December 29, 2010

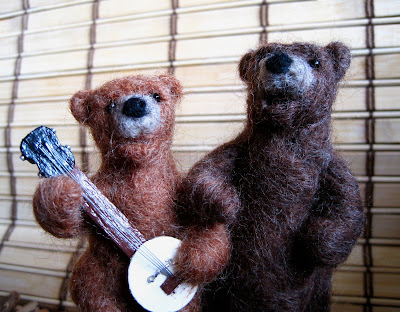
Bear Band

Down-home, banjo strummin' Bear Band!

Live! Every night!
Marietta, OH


For Christmas I made Sara and Bobby a set of singing bears. The bears are needle-felted from two colors of wool roving, with additional accent colors for the snout and nose. I used black glass beads for their eyes. The banjo was constructed from a circular wood piece (from Michaels) and a couple balsa wood pieces that I carved. The strings are made from jewelry wire and the accent pieces are tiny metal beads.

The stage was originally the lid to a wooden box (which was used as the shoebox for the doll armoire). I removed the hinges and latch, filled the holes with wood filler, sanded it down and added a couple coats of paint and satin polish. I also added a piece of purple felt to the bottom.

The little wooden chair was put together from a Craftology kit for wooden doll furniture, courtesy of my sister Susanna. After I assembled it I gave it a couple coats of paint, then sanded the edges to make it a little more country.


December 28, 2010

Felt Ornaments

A bunny for Christine

For many years now, every Christmas I make ornaments for my cousin Christine and aunt Maria. I always choose a new medium (related to whatever my craft obsession of the year is). This year, surprise, surprise, I needle felted the ornaments.

A little blue Penguin for Maria

December 21, 2010

Fashionista Dolls

Wow, Priority Mail! The gifts we mailed on Saturday traveled 3,000 miles and arrived Monday!

Which means that since our nieces are going out of town for Christmas, they got to open our gifts early. Judging by the 4 voicemails Mike received requesting that "he please call them", I think the gifts were a hit.

I worked really hard on the gifts for the girls this year, and loved every minute of it. Last July I made three crocheted dolls for the older girls, assuming that the baby would be too young for a doll. As one of three girls myself, I should have known better. No little girl, no matter how young, will sit idly by while her three older sisters are playing!

This little Corkscrew completes the set of 4 dolls for 4 girls.

The Original Three


In addition, I couldn't let those dolls go through a Pennsylvania winter without a few more clothes. I may have gotten a little carried away...

Total: 4 dresses, 4 coats, 4 pairs of shoes, 4 tops, 1 pair of overalls, 1 pair of shorts and a skirt
(My "model" doll also helped model some of the new clothes)


Luckily, I also made somewhere for the clothes to reside.


Using an old, wood cigar box purchased from a local antique store, I covered the inside with patterned rice paper, and painted the outside with pink enamel paint. I lined the inside of the door with embossed felt, created a shoe trunk from a wooden box, added wood finial "feet" and a wood flower for a knob. I also painted a couple wooden flowers and glued them to the inside of the door as "hooks" and glued a mirror onto the felt with a felt border. Lastly, the closet rod is a painted wood dowel and the hangers were fastened from 18 gauge wire. Voila, a doll armoire!

It was very fun to figure out and make, and I'm very tempted to make one for myself now!
Merry Christmas Girls!

December 20, 2010

It's that time of year again...

So little time to blog post this month! My free time has been consumed with gift-making and social celebrating. I have been enjoying myself this month, and since the last couple of months have been a little more difficult, I'm glad to have finally hit a time when things are a little more fun.

All of my craft projects for the past 6 weeks have been gifts, so I can't share photos of them yet. I can share a teaser however.


Mike and I have also had a great time celebrating: Ryan's birthday at the 3rd Annual beer tasting party, Kir Wine Bar with Jessica and Bobby, the Crafty Wonderland Super Colossal Sale with Alan and Anja, and an impromptu drive to Hood River for dinner and snow viewing

Tomorrow we head north to celebrate Christmas with family. With just a few more pieces to glue and presents to wrap, I'm almost ready to celebrate!

Happy Holidays!

December 9, 2010

Shout out to my Sisters!


My sister Sara's new book, Soil Mates, hit the shelves this month - so exciting to see her name in print! Not only that, but my sister Susanna wrote all the recipes for the book, so both of their names are in print! I've already ordered my copy, and several others for gifts.

Sara and Bobby have also been getting lots of press, for the book and for their business. Check out the following links:

• An interview at Inspiration for Writers

• A little write-up in the NY Times


• There is also a feature in the January issue of HOW Magazine's "Young, Hungry, Creatives", with an incredibly adorable photo.

In addition, a special pat on the back goes to Susanna, who visited us last weekend to work on her needle-felting, and who managed to sell all four of her pieces on the train home without even trying!

Good thing I have excellent self-confidence, or else my sisters would be putting me to shame. Keep up the good work ladies!

December 2, 2010

Over the narrows and through the woods...


Last weekend we celebrated another wonderful Thanksgiving at Papa and Sharon's house on the Kitsap Peninsula. This time there was a light dusting of snow on the ground. And while gorgeous to look at, it made travel much more difficult (Susanna was in desperate need of a strong drink when she finally arrived). But we all arrived safe and sound, ate well and relaxed well (they got a hot tub this year!).


Like in years past, we all brought a project to work on for the long weekend. Recently Clayton built a treehouse for Aidan in the woods near their house. Aidan realized that the place was lacking that certain "homey" touch, so worked with Poppy in the shop to craft some wood chairs. I determined that they were the perfect size for little boy butts, but that we could put them together for the perfect Auntie butt fit.


Susanna had expressed some interest in learning how to needle felt, so we pooled our supplies and spread out on the dining room table. As luck would have it, Katie, Jamie & Max were also able to join us for part of the weekend, and Katie was just as excited to learn needle felting.

Susanna worked on felting some appliques to add to fingerless gloves, and all three of us worked on creating 3d penguins.


Our eyeless penguins. All very different, and way too cute for their own good.
Left to right, mine, Susanna's and Katie's.

November 22, 2010

Cider Press


On the last weekend of October Mike and I headed north to Sedro Woolley to partake in the 2nd Annual Franklin Apple Pressing.

My sisters and I have many fond childhood memories of heading to Peshastin, WA to press apples at my uncle's house, and a couple of years ago we started talking about how to make that a memory for my nephew too. Last year, by sheer luck, Clayton won an electric apple cider press in a raffle at a county fair.


This press is beautiful, handmade and well-made, and best yet, has an electric motor for grinding the apples (no hand cranking!).


We started by moving 900 lbs of apples from the crate into a water bath.


Not a bad idea to taste-test the apples first - particularly the ones shaped like butts.


For those who've never made cider before, the premise is very simple. Drop apples in the top hopper, turn on the motor (or start hand-cranking), and watch the fragrant pulp drop into the barrel below the hopper. Once that barrel is full, slide it over underneath the press portion. Turn the press crank and cider starts to seep out the bottom. Make sure you have a bucket ready to catch it!


Eating a few bites of apple, then throwing them on the ground for the dog to finish was a popular past-time for the small children. I don't think they'd ever seen so many apples in one place before!


Our bottling operation: After the cider was pressed, it went through a couple of strainers to further eliminate pulp. From there we funneled it into gallon jugs (collected, cleaned and donated by all the participants of the pressing).


An incredible 55 gallons! There were at least 30 people participating in the press, and everybody went home with some cider. Mike and I took three gallons, and at the suggestion of others, stuck them in the freezer when we got home. We just pulled out a gallon to thaw when we felt like cider. Sadly, we're down to our last few drops, but looking forward to the 3rd annual Apple Pressing!

November 18, 2010

Maxwell, the doll


Baby “Sweetcheeks” Maxwell turned 1 earlier this month!

He has grown into such a handsome devil, that when Mama Katie asked that I make him a doll for this birthday, I thought no one better to model it after than Maxwell himself.


For the doppelganger Maxwell doll I used the Benny the Monkey pattern by Beth Doherty as my base pattern (see blue/green monkey below left). Naturally, I dropped the monkey muzzle, eyes and ears. I also shortened the legs, and added my own ears and facial features.


I used cotton worsted weight yarn for the body so was able to needle-felt the eyes and cheeks directly onto the head. Maxwell has a great head of reddish-curls, and his doll follows suit with some lovely angora curls. The overalls are removable and the straps are secured with snaps.


Gotta love those Bobble-toes!

November 14, 2010

Ninkasi-inspired Soft Pretzels


In early October Mike and I went to Eugene for our annual football game, and while there we went to check out the Ninkasi Brewing Company's tasting room.


Ninkasi is one of my favorite breweries, but until recently they didn't have any sort of local retail component. They don't have a full pub, but their tasting room has many of their beers on tap and they do offer some great little snacks; including the best soft pretzel that I've ever had. It took close to 25 minutes to get it, but it was well worth the wait.

As a result of that great pretzel, I became determined to go home and make my own. Alton Brown's recipe on the Food Network was the first recipe I found so I went with it.

I've made the recipe twice so far and have found it to be super easy and yields some very tasty results.

Ingredients

  • 1 1/2 cups warm (110 to 115 degrees F) water
  • 1 tablespoon sugar
  • 2 teaspoons kosher salt
  • 1 package active dry yeast
  • 22 ounces all-purpose flour, approximately 4 1/2 cups
  • 2 ounces unsalted butter, melted
  • Vegetable oil, for pan
  • 10 cups water
  • 2/3 cup baking soda
  • 1 large egg yolk beaten with 1 tablespoon water
  • Pretzel salt

Directions

Combine the water, sugar and kosher salt in the bowl of a stand mixer and sprinkle the yeast on top. Allow to sit for 5 minutes or until the mixture begins to foam. Add the flour and butter and, using the dough hook attachment, mix on low speed until well combined. Change to medium speed and knead until the dough is smooth and pulls away from the side of the bowl, approximately 4 to 5 minutes. Remove the dough from the bowl, clean the bowl and then oil it well with vegetable oil. Return the dough to the bowl, cover with plastic wrap and sit in a warm place for approximately 50 to 55 minutes or until the dough has doubled in size.
Preheat the oven to 450 degrees F. Line 2 half-sheet pans with parchment paper and lightly brush with the vegetable oil. Set aside.


Bring the 10 cups of water and the baking soda to a rolling boil in an 8-quart saucepan or roasting pan.
In the meantime, turn the dough out onto a slightly oiled work surface and divide into 8 equal pieces. Roll out each piece of dough into a 24-inch rope. Make a U-shape with the rope, holding the ends of the rope, cross them over each other and press onto the bottom of the U in order to form the shape of a pretzel. Place onto the parchment-lined half sheet pan.

Place the pretzels into the boiling water, 1 by 1, for 30 seconds. Remove them from the water using a large flat spatula. Return to the half sheet pan, brush the top of each pretzel with the beaten egg yolk and water mixture and sprinkle with the pretzel salt (or asiago cheese, as shown below).


Bake until dark golden brown in color, approximately 12 to 14 minutes. Transfer to a cooling rack for at least 5 minutes before serving.


Enjoy plain, or with a variety of mustard. Ninkasi served theirs with the Beaver Honey Mustard, which is now my soft pretzel mustard of choice.
Related Posts Plugin for WordPress, Blogger...